Problem Solving “On-the-Fly” or With a Plan:

image_pdf

A Few Real World Examples, Tips, and Solutions.

Snow Bound Sedan

I posted this photo in my January 3rd entry of the January 2015 Daily Updates and Photos page.  It is artsy (textured) image of an old rusty automobile along High School Road here in Jackson. I’ve lived here 28 years and never stopped to take a photo of it. During the summer, the old car is somewhat lost in the high grass. During the winter, the deep snow simplifies the composition and isolates the dark object. Evening light adds interest and texture to the snow. The problem is the tall fence between the road and the vehicle. The other side is private property. The land owner grazes cattle in the field, so getting permission to be on the property would probably be tough. Some shots offer “challenges” needing solutions!

On this page, I will go through a few of the possible solutions.

You’ll likely run into a similar situation at some point!

Winter Fence

I spend a fair amount of my time and attention looking for something interesting to photograph. I call it “reconnaissance mode”. I was heading home from taking photos of the Swans at Boyle’s Hill and saw this snow covered old rusting vehicle. As I mentioned earlier, I had seen it hundreds of other times. I pulled over and parked next to the fence, then surveyed the situation and decided it was something worth photographing. I went back to the vehicle and pulled out a camera. It turned out to be quite a challenge! The top of the posts and barbed wire is roughly six feet from the ground. The wire mesh at the bottom is too tight to get a camera through and the angle is wrong to simply shoot from under the barbed wire.

1st Option: Get What You Can On the Fly

This subject happens to be only a couple of miles from my house. I know I can go back over and over until I get the shot I want. There are subjects that are only available one time, like some of the subjects on my Maui trip. If this was my one and only opportunity, here are a few options I might have tried:

  • Shoot from just over the mesh wire, but open the aperture all the way to attempt to blur out distant distractions. Some of them might need to be removed in post production.
  • I knew I couldn’t look through the viewfinder if the camera is well above my head, so I used LiveView to help compose the scene. I focused first, then put it in Manual focus mode, so I knew I would only be relying on LiveView for composition. I rested the camera on the top of one of the posts with VR turned on. This actually worked fairly well, but I really needed to get the camera higher. For anyone not familiar with LiveView, you just flip a lever to LV on the back of the camera body. Instead of viewing the scene through the normal viewfinder, the image is displayed on the back of the camera’s LCD—much like an inexpensive point-and-shoot camera. LiveView is not a great option if the sun is directly behind you and washing out the LCD image.
  • Spray and PrayA similar option would be to use my 35 megapixel D800 body and shoot “wide” or “loose”. I call it “spray and pray”.  I pre-focus, change to manual focus, then simply hold the camera as high as I could and as still as I could and “point in the general direction” for a few dozen shots. I’d hope one of them was good enough to crop and process. It’s actually harder to do than you might think, but at least you have a chance!

One of the above options should have given me a useable photo.

2nd Option: Plan It Out. Gear Up and Go Back!

Tripod and Ladder

The first time I took any photos of that vehicle was during unappealing mid-day light. I knew at the time the shots I took were not going to be the ones I would eventually want. Again, I was in reconnaissance mode. Those first images gave me something to think about and let me develop a series of options. My original “on the fly” solution was to use LiveView. Good call! It worked out well. By my second trip, I had considered a few more options.

  • CamRanger: The CamRanger was an option worth considering. I could get the camera well above my head, either on a bean bag on a post or on the top of my extended tripod, then compose and focus via the screen on my iPhone or Android pad. I chose to photograph the image with a D800 and a 200-400mm lens. A 70-200 might have worked well enough, too, but I felt I wanted to zoom in fairly tight on some shots. The CamRanger could have done the job, but I would have needed to zoom around, view and focus at the pad. If you go to their web site, you can see other options, including adding a motorized unit to tilt and pan when on top of an extended post.
  • My Solution: A few years ago, I purchased a heavy duty, carbon fiber Manfrotto tripod capable of extending out to roughly 7′. I have a smaller, lighter Gitzo carbon fiber tripod I use most of the time. The big one can get heavy especially when I use the Manfrotto 504 Video Head on it, so I have it ready for specific kinds of shooting and for oddball needs like this one. When the legs are extended and the head is attached, the camera’s viewfinder is a good 7′ off the ground. I recently purchased a 4′ fiberglass stepladder to use for just such occasions. The ladder lets me have full access to the viewfinder, focus and zoom features on the camera. This stuff fits easily in the van. I waited until late in the evening and prepared to get the shot.
  • Alternative Solution: Back at home, I have an 8′ and 10′ fiberglass stepladder. These also work to help me get higher. My lighter Gitzo tripod can straddle the top of the ladder and I can climb to a comfortable step on the ladder. Normally, when I know I need either of these two ladders, I strap them to the ladder rack on my truck and I take it to the shoot. In other words, I don’t have them with me on most days, while it is fairly easy to keep the taller tripod and small stepladder in the van.
  • “Cost Is No Factor” Solutions: I already have a tall tripod and the 4′ stepladder was relatively inexpensive. If the shot merited the expense,  someone could rent scaffolding, a GradAll or cherry picker. There are also “booms arms” to get cameras into unique positions.

Evening Vehicle

I don’t know if this is an award winning image or not? Was it worth all the effort? Probably…even if only for the mental exercises it took to get the shot. I’m also working on a Feature Post called something like: Good Light / Bad Light (Aka…It’s All About that Light…’Bout that Light). I have been collecting shots showing how important the good light is to a shot. A few minutes after the image above, the sun dropped below the mountains and the scene dulled dramatically.   It has also occurred to me to go back some late evening and “light paint” it. I’ve solved most of the rest of the issues, so adding some artificial light wouldn’t be too difficult.

Oxbow Crowd

I’ve also considered taking the little stepladder and this tripod to Oxbow Bend during the peak foliage period. There would be an elbow to elbow row of photographers guarding their spots they had been holding since around 4:30am. I thought it might be fun to set it up right behind them and shoot over their heads, but of course, I could sleep an extra hour or two. I wouldn’t need to get there until a couple of minutes before the best light. Maybe next fall! I’ve used this tripod and even the longer stepladders at Cunningham Cabin. It allows me to get a little higher to eliminate an issue caused by the roof line hitting a distant horizon line.

A while back, I created this post: Get Down—and sometimes dirty!  The idea is to change from the normal “pedestrian” view (about 5 feet off the ground) to a vantage point just above the ground. In this case, I’d be changing the vantage point to above what most people are used to seeing.

CamRanger in Action

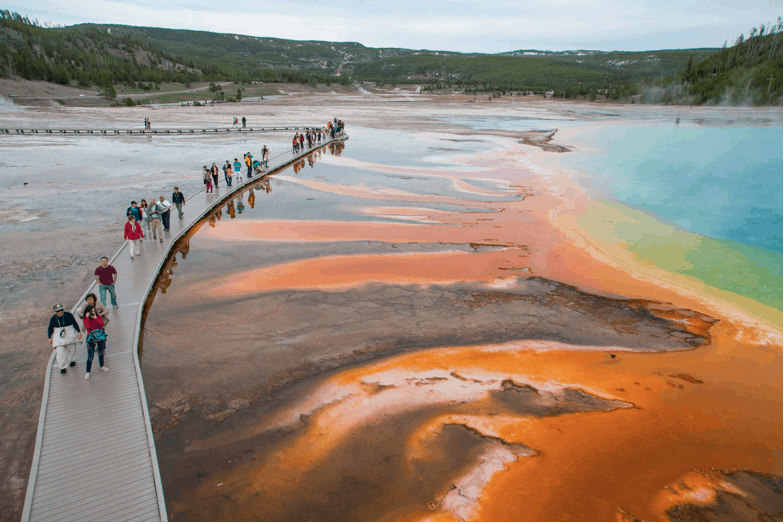
This image is on CamRanger’s site: Wireless Control With the CamRanger PT Hub, MP-360, and Pole

Note: I didn’t take this shot! It shows how changing the vantage point can be memorable and dramatic. Somewhere out in the pool is a drowned hoover craft someone used for a similar shot. After losing control of it, he now has some big fines to pay. As far as I know, extended poles are currently not illegal in the parks for normal still photography.

Chevy Truck

Chevy Truck: This is an old dump truck well off the road on private land taken in November of 2012. I took this shot with the camera very close to the ground to hide some irrigation ditches and clutter. There are a couple of textures applied over the top of the original JPG image.

750line

Go to Source

Here Today, Gone to Maui!

image_pdf

A Jackson Hole resident magically morphs into a Maui tourist.

Waterfalls

I had to put the “shoe on the other foot” and become a tourist for about 10 days. I’m not used to it! When heading out in the mornings in Jackson Hole, I usually live up to my old Eagle Scout motto: “Be Prepared”! I take everything I think I might need—and sometimes two of everything. Here in the Tetons, I get the luxury of going to a spot over and over until the light and the clouds cooperate. I have all year. Tourists come and go here like the waves on the beach there. I get to pick the best times of the day and the best times of the year. Like I said, it’s a luxury.

Fishermen

I have enough camera gear to fill a van. When I packed my gear to go to Maui, I probably had to make similar decisions people have to make if they get on a plane to fly to Jackson Hole and Yellowstone. Some people coming here have their prime lenses shipped to a trusted friend in the valley. I didn’t have that option, however. In reality, packing was probably easier for me because I was only going there for “vacation” time and vacation photos. I doubt I’ll ever sell one, nor use the images for anything much more than a blog post. Some people coming to the northwest corner of Wyoming probably need and want the very best images they can capture, so they need their pro gear.

Fiery Sunset

The day before we headed out, I grabbed my small camera bag. Naturally, I have two, but I didn’t think the bigger one would fit in the overhead compartment. There was no way I wanted to check the photo gear. By the time I zipped it up, the poor thing was stuffed. It did fit in the overhead compartment—and it made the trip with no problems!

Windsurfer

I would have loved to have taken the 200-400mm lens and the 70-200 mm lens, not to mention the regular 24-70 mm workhorse lens and my wide angle 14-24mm lens. I would have loved to have taken my Gitzo tripod, ball head, and Wimberley Sidekick. I chose to take my Nikon D4 body and the all around Nikon 28-300 mm zoom lens. It’s not quite as sharp as my other pro lenses, but it’s lightweight and does a very good job. The tripod was another issue. Before I left for Hawaii, I took my Arca-Swiss ball head off my tripod and found a corner for it in the bag…just in case.

Fiery Sunset

My wife, Darla, and I went light. I had one small suitcase and one camera bag. She had a handbag and purse to carry on the plane and one mid-sized suitcase. Our friends met us at the airport and saw our “load” and said, “That’s it?” Of course, they had three or four big bags each, some of which contained computers, snorkel gear, and other “essentials” for a trip to Maui.

Palm Trees

So, I went to Maui without a tripod. Oh, that hurts to think about it—especially knowing I hardly ever take a shot without one! I got up before sunrise the first morning and took photos hand held, then knew I’d be buying “some kind of tripod”. That turned out to be a good call, and I know I’ll use it some other day. Now, I have three tripods instead of just one and a backup.

Hana Sunrise

The tripod I purchased came with a lightweight ball head. I pulled my Arca-Swiss Z1 ball head out of the bag and replaced the small one. The D4 seemed to be happier on the heavier ball head. I used the tripod for my morning and evening landscapes, long exposures on the waterfalls, a few remote controlled family shots, and several night images.

Giant Sea Turtle

Maui doesn’t have a lot of wildlife—above water anyway. But then, it does have killer sunrises and sunsets. Stunning, in fact! If I could have squeezed it in, I would have loved to taken my 35 megapixel D800 body and my pro model 24-70mm lens for the morning and evening shots. And, there were a few times, I longed for the reach of 400mm on my 200-400mm zoom lens. Those occasions would have probably been limited to the shooting at the ocean of the surfers and later with some of the birds. The 28-300mm VR lens worked fine, however, and it focuses amazingly close!

Night Bonfire

This was my first trip to Hawaii. I suspect I went through much of the same experiences people have when they come to Jackson Hole for the first time. If you do your homework by going through some of the pages on this blog, you’d be far ahead of the others that don’t! Let’s say I went to Maui in the latter shoes. I didn’t have a clue about any of it—other than I knew there’s an ocean, sand, waves, and some lush forests. I picked up some of the many travel brochures and trip guides and studied them…just like people do here. I certainly felt like a tourist, made worse by my snow white legs and chest when on the beach. Oh well.

Night in the Bay

I was out before daylight on most mornings after scouting out locations during the afternoon hours the day before. Darla and the rest of the group were just waking up and finishing their coffee when I’d drag in from the early morning shooting.

Underwater Sea Turtle

Above the water, I can’t say too many things were that different as they relate to photography.  Underwater photography…well that’s a different proposition entirely! A friend let me use an underwater camera for one of the dives. It wasn’t easy for me because I was having to learn to breath through a snorkel and take photos with a foreign camera at the same time.

Beachcombing

Just like visitors to the Tetons on a four or five day trip, I had to accept the conditions of the morning, day or evening. It seems the mornings and evenings are usually spectacular there, especially knowing you can look another direction if it isn’t great in the other one. Still, if it was raining when we went to a specific waterfall, that’s just the way it was going to be. There was usually no going back for another chance. Sometimes, people come here for four or five days and never see the Teton Range. I suspect some people never see the top of the Haleakala Crater either.

Cardinals

Before it was all over, we made the drive around the entire island and we spent a lot of time along the ocean. We got to snorkel in two places. We saw the giant sea turtles, both on the beach and under water. We saw surfers, boarders, wind surfers, and kite sailors.

Poinsettia and Bee

We spent money like tourists, had a great time at the Halloween event, and ate some wonderful food. I had at least a hint of a tan when I made it off the plane.

Tree

I saw things in Maui I’ve never see here. It was a feast for the eyes! But then, someone from Hawaii might be equally impressed by our wildlife and snow.

Textured Leaf

Just about anywhere you turn, there’s some sort of potential subject! My D4 ended up with around 6000 actuations added to it, virtually filling every CF card I took with me.

Sunset in Maui

I hope to get to go back someday!

Maui

After returning home, Darla wanted me to make a book to document our vacation. I spent a few days creating it and then published it through Blurb. If you’d like to view the book, click the thumbnail cover image and flip through the pages. (Hit the four way arrow in the lower right corner to make it fill your entire screen and then hit the ESC button to go back to regular view)  There are a lot more images in the book!

http://www.bestofthetetons.com/wp-content/uploads/2014/04/750line.jpg

If you are planning a trip to Jackson Hole, bring as much of your gear as you can! It’s a great place for landscapes, nightscapes, wildlife, and close-up photography—and that’s not counting all of the possibilities for outdoor sports and activities! I’d suggest bringing lots of memory cards and a tripod! Of course, spend some time going through the posts at Best of the Tetons for a huge head start. If you’d like to go with me on a one-on-one photo excursion here in the Tetons, click the link for more info! No matter how you get here and how much gear you bring, I hope you have an equally rewarding experience.

http://www.bestofthetetons.com/wp-content/uploads/2014/04/750line.jpg

If you like this post, please Share it using any of the Social Media Icons below!

Go to Source

Jackson Hole News and Guide Close-Up Feature

Jackson Hole News and Guide Close-Up with Mike Cavaroc

If you’re in the Jackson Hole area, be sure to pick up the current weekly edition of the Jackson Hole News & Guide! In the weekly section, Close-Up, I’m currently featured for my efforts in getting Jackson, Wyoming and surrounding areas to be dark-sky compliant. I’m very honored to be featured so prominently about my work that coincides so directly with what I love.

The article goes into a lot of depth about my past and how I got to where I am now, and also brings up the issues I’m working to raise, such as the marketing potential that Jackson is letting slip by, particularly with the upcoming 2017 Total Solar Eclipse and many other nighttime activities.

For those that don’t know, over the past year I’ve been working with Wyoming Stargazing and the Teton Photography Group to bring more awareness to the Jackson Hole region about the dangers and inefficiency of light pollution. Light pollution is the scattering of light at night that obscures the night sky. If a light fixture is not shielded nor pointing down, the light scatters up into the sky, thus producing “light pollution.” This creates a very negative effect on human health, wildlife and the ecosystem, safety for pedestrians and drivers, and consumes significantly more energy than is actually needed. In addition to those consequences, it drastically reduces what’s visible in the night sky, eliminating a key component of our natural, daily cycle and a source for Universal perspective.

As our progress has continued, we’ve received great support from the community, as well as the Jackson Hole & Yellowstone Sustainable Destination Program and the Jackson Hole Conservation Alliance, the latter providing a wealth of knowledge and guidance in helping us target our message to the most conducive recipients.

2015 should see lots of progress in bringing back our night skies as well as what will hopefully be my first full-length documentary, something I’m currently in the process of producing.

For those not in the Jackson Hole area, the full article can be read online at this link on the News & Guide website: Seeing the light of darker skies.


Read on Source Site

Music from Reclaiming the Night: Jackson Hole

During the editing process of Reclaiming the Night: Preserving the Dark Skies of Jackson Hole, Wyoming, I was confronted with a bit of an issue: I had no music. I knew how important music is to a film, but I had no budget to license tracks, let alone hire someone to create an original score, even if they were a friend. I was left with only two options. I was either to pirate music or make my own.

Being a content creator myself, I wasn’t about to pirate any music for my film. So, with absolutely no music production experience, I tried to create my own. – Read more

Read on Source Site