Six months old – and going (fairly) strong

It is hard to believe that it’s been more than 6 weeks since my last posting but it is even harder to believe that Natural Photography is 6 months old!

It has been a very busy summer shooting and traveling to unique sites and more of our public lands. (That’s my excuse and I’m stickin’ to it – for the long delay since the last posting.) On the other hand, the website has been extensively updated with a dozen new photo galleries and many additional photos added to previously existing galleries. The revisions add galleries for new national parks and public lands visits but also add many more specific species and settings in which to locate wildlife photos that may be most interesting to you. Specifically, there are new galleries in the Fauna section for mountain goats, bison, and pronghorn and new galleries for waterfowl, wild canines, small mammals, and, a sure favorite, babies and young-in’s.

Besides many more photos from Yellowstone, I have added seasonal sections for our Jackson Hole neighbor, Grand Teton National Park. A recent trip to South Dakota allowed shooting at Devil’s Tower National Monument, Mount Rushmore National Memorial, Crazy Horse Memorial, Wind Cave National Park, Jewel Cave National Monument, Badlands National Park, and the wonderful Custer State Park, South Dakota.

On the business side, I have added password-protected areas for individual clients to view pending orders and requested focused photo catalog previews for easier item selection. I have added a similar feature for commercial clients who want to view specific photos and other products. This area is also password-protected for each commercial client. I am hopeful that these customized folders will help you more efficiently select items that will best meet your specific needs. Both areas allow direct electronic communication to answer your questions and expedite your orders.

Finally, while I have been delinquent in posting to this blog, I have been more diligent in posting to Facebook. (https://www.facebook.com/NaturalPhotographyJackson)  While the Facebook page is more intended for fun and frequent updates on activities, some of the Facebook photos are also available for view or purchase on the website. If you have a specific interest in any of the Facebook photos, they can be made available in a full-size, high-resolution format for any of the products listed on this site.

I hope you are able to get away this summer and enjoy nature close-up in your favorite location but if your travels are limited you can always vicariously join our travel on this site or Facebook. Have a GREAT summer and thanks for visiting Natural Photography.

Loren 

Yellowstone – a nature and wildlife photographer’s paradise

I get a lot of comments and questions about my many photos from Yellowstone National Park (YNP) so I thought I would give a very quick overview of the park and some of its best known treasures.

Current road status map

Yellowstone is the world’s first national park dedicated to preserving the uniqueness of the natural beauty of our country for future generations. It was established as a model for all national parks in 1872 and its history has been colorful and controversial.  Most of YNP lies withing the state of Wyoming but it extends into Montana and Idaho.

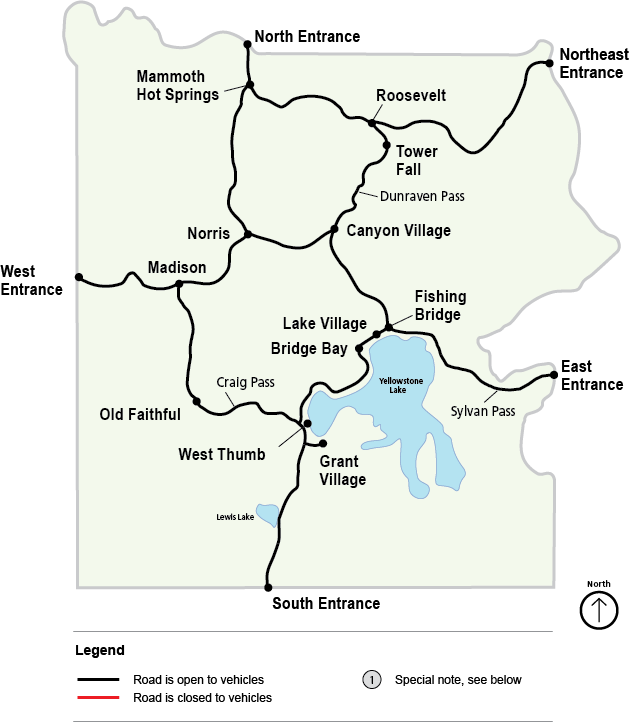
There are 5 major highway entrances to the park. The Grand Highway of Yellowstone is a giant figure of eight, paved highway connecting most of the park’s main attractions.  Gardiner, MT is the north entrance to the park headquarters at Mammoth Hot Springs and is the only entrance that is open to automobiles year round. The northeast entrance is near Cooke City, MT and leads to Tower Falls on the north part of the figure eight. It is closed to autos in the winter months when the Bear Tooth highway is closed.  Access to the east entrance is from Cody, WY  to the Lake Village / Fishing Bridge area and this entrance is closed in the winter. The south entrance is one of the most popular routes into the park from Jackson, WY through Grand Teton National Park and the Rockefeller Parkway. The south entrance is closed to autos in the winter but Flag Ranch (near the south entrance) is a popular entrance for snow coach tours and snowmobiles. Finally, West Yellowstone, MT is a popular tourist town and center for winter activities near the west entrance to YNP.  The road leads to Madison Junction and then south to Old Faithful or north to Norris Geyser Basin. 

There are literally thousands of attractions to YNP but the “big five” are probably Old Faithful Geyser, the Grand Canyon of the Yellowstone, Mammoth Hot Springs, Lake Yellowstone, and the large animal populations of the Hayden and Lamar valleys.  Old Faithful at sunset

Old Faithful geyser, on the west side of the south loop, is one of more than ten thousand thermal features in the park that include geysers, fumaroles and steam vents, hot pools, and boiling mud pots. There are about four times as many active thermal features in Yellowstone as the rest of the world total.  Old Faithful is named such because of its regularity of eruption – about every 70-90 minutes. Other geysers are larger and more spectacular but the predictability of Old Faithful and its closeness to parking and lodging make it a crowd favorite.  The Grand Canyon of the Yellowstone River

is at the east junction of the north and south loop roads.  This is where Yellowstone got its name and is the home of the two largest waterfalls in the park.  The canyon carved by the Yellowstone River is up to 1200 feet deep, three-quarters of a mile wide, and 24 miles long. The Upper Falls is 109 feet and the lower Falls is 308 feet in height and both are readily view-able with short walks from the many parking areas.  Mammoth Hot Springs in summer

Mammoth Hot Springs is near the park headquarters at the north entrance.  Once the center for tourism with its terraced hot springs and colorful stone formations, the springs are seeing less water flow and becoming bleached white as their thermal activity decreases.  Lake Yellowstone is the source of its namesake river and the largest and deepest lake above 7,000 feet altitude in North America. Its cold, deep, blue water has a shoreline of 110 miles and an average depth of 139 feet.

 Finally, while nearly all of YNP has abundant wildlife, nowhere are the large animals more visible than the great valleys of Lamar, near the northeast entrance, and Hayden, between Canyon and Lake Village. In these valleys are huge herds of bison numbering in the many hundreds, elk, mule and white-tail deer, pronghorn, black and grizzly bear, wolf, coyote, and many large bird species and small mammals.  Roadside parking and the broad vistas make wildlife viewing as simple as picking up your binoculars.

I could go on for hours about all of the other attractions but remember the 310 miles of paved road (466 miles total) and 1,100 miles of developed trails from 92 trail heads access only a tiny fraction of the park’s 2.2 million acres. There is truly an unlimited amount of outdoor  activity throughout Yellowstone. People ask, “How long should I plan to see the park?” The answer is as much time as you have but it takes at least 3 full days and two nights in or near the park just to drive to the major attractions. They also ask, “What month is best to visit?” All of the months are great and offer tremendously different views of the park. The north entrance is open to autos year round but the other entrances vary in opening from around late April to mid-May and start closing in October. Yellowstone is at high elevation, 6,500 to over 8,000 feet, and snow can and does come every month of the year. There is winter snowmobile and snow coach access from both the south and west entrances and great snowmobiling out of the park from the northeast entrance.  There are over 3 million visitors annually with the vast majority coming in July and August. Locals will tell you that May and September are the “best” months because there are fewer visitors.

I hope you enjoy some of the photos of the park and that they will stimulate your interest in visiting this word treasure.

High Dynamic Range (HDR) Photography

High Dynamic Range (HDR), what is it, why should I know about it, and what can it do to broaden my photography? Three simple questions so often raised by those new to digital photography that are often difficult to answer. In this post I will try to give a straight forward overview of HDR that will allow you to experiment with the techniques to determine if HDR has a place in your photographic armamentarium.  

First, what is dynamic range? Dynamic range defines the breadth of luminosities that can be visualized. Luminosity is the term used to define the brightness of an object.  Luminosity along with hue (color) and saturation (intensity of color) determine how we see an object or the image of an object. Our eyes have an incredible ability to detect light simultaneously at low and high luminosity. This range is typically quantified in exposure values (EV) or more often as f-stops.  One EV or one stop is the equivalent of doubling the about of light. The dynamic range of our eyes is about 18-24 stops – a huge range of light intensity from dark shadows to very bright highlights. Cameras don’t do so well.  A single image captured with a film camera may retain image detail over about 8 stops; a digital image captured with a very high-end dSLR camera may retain detail over a range of about 10-12 stops.  In other words, our very best cameras cannot process an image with variations in tonality or brightness as well as our eyes.

This was a big problem in the days of film when painstaking dodging and burning were done in the darkroom but with the advent of digital imaging and sophisticated processing software we are able to produce HDR images with a tonal resolution nearly equal to our eyes. The theory of how this is done is simple. By capturing multiple images at different exposures, the processing software can use the low luminosity data from over-exposed images and high luminosity from under-exposed images and combine and process the data to give a greatly expanded dynamic range.  In other word HDR gives you the ability to extract more image detail from both the bright and dark areas of a scene giving the image a feel closer to what you visualized with your eyes. However, overdoing HDR processing can transform a good image into a quirky, over-done, cartoon-ish image that has too much contrast and is too highly saturated. HDR can create a surrealistic feel to an image that may be desirable or not.

What subjects make the best HRD images? First, static subjects are usually much more appropriate for HDR processing than moving subjects. Subjects with texture and a wide range of tonality (variations between bright and dark) are often best for HDR. Often subjects with bright and highly saturated colors can be dramatic in HDR. People or wildlife that are stationary may be imaged using HDR processing but moving people or objects create problems with the processing and often do not work well.

You can imagine that the way to expand dynamic range of an image is to capture the bright and dark areas of a scene by intentionally over and under exposing the subject and that is exactly what we do. The shooting technique is to capture three or more identical images at different exposures. Always shoot in RAW format because you heed a large bit-depth to process the final image and JPEGs will always disappoint you when shooting HDR.  To be certain that the images are identical it is desirable to use a tripod and capture the multiple images as rapidly as possible using the high-speed burst exposure mode of your dSLR.  Most dSLRs allow you to use a mode called auto-bracket exposure – in other words, the camera rapidly captures 3 or more images at the exposure you have set and at an exposure that is intentionally over and under exposing the image.  The exact way you do this is important. Your camera should be on a tripod and the mode set to aperture priority (Av on Canon and A on Nikon.) The reason for using aperture priority is that you want to change the exposure by changing shutter speed not aperture. If aperture were to change, you would create images with different depths-of-field and so focus/sharpness would be different between the highlights and the shadows.  You can see why you want a static, non-moving subject because the variation of shutter speed and the timing of the multiple exposures would cause variation in the sharpness and position of the subject. This produces an artifact in the processed image called ghosting (more later.) Finally, you want your exposure bracketing to be at least 3-6 total stops.  That is, if you are shooting 3 bracketed exposures, the shutter speeds should be a minimum of one to two stops higher and lower that the ideal metered shutter speed resulting in images that are significantly over and under exposed. I typically set my HDR bracketing on my 7D at 1 1/3 stops for three shots in a moderately well lighted scene. If there is large variation between the shadows and highlights I will increase the bracketing to 1 2/3 or 2 stops.  The 7D like many dSLRs will only shoot 3 bracketed shots. On my 5DIII I set the bracketing at one stop and shoot 5 to seven bracketed shots.  I generally shoot two sets of images for each composition and I try to remember to shoot each set in both horizontal and vertical formats.

Now that you have captured the images it is time to look at HDR processing. Some of today’s newest cameras allow HDR processing in the camera. That said, most photographers want the control of post-production software to refine and tune their images to meet their exact needs. There are many dedicated HDR programs that work independently or with Adobe Photoshop to create the processed image. Each program has pros and cons beyond the scope of this introduction. The good news is that most of these programs can be down-loaded for a free trial period so you can choose the one with the features and results that you want. The two most popular stand-alone programs seem to be Photomatrix by HDRSoft and HDR Efex Pro by Nik Software.  Both of these also work as plug-ins with Adobe Lightroom and Photoshop. There are also a growing number of free and shareware programs and, of course, Photoshop itself does HDR processing and this was my personal choice.

Each HDR program collects, aligns, and processes the 3-9 individual, bracketed images you have shot and down-loaded. The 12 or 14-bit images are converted to a huge 32-bit image for processing so you can imagine that you need some pretty sophisticated processing power in your computer. The images ate ‘tone-mapped’ to select the highlights and shadows that will have the most detail for the final image. Once the mapping is done you have the ability to select how you want to process the final image in terms of contrast, saturation, exposure, and the ‘strength’ of the HDR effect. All of the programs have a variety of presets to help you get close to your desired effect.  You also have the ability to eliminate ghosting that may be present if there was movement in the scene during capture or incomplete alignment due to camera movement.  Lastly, the image will be outputted for viewing as a very large PSD or TIFF file or as a compressed JPEG.

The results of HDR processing may surprise you, please you, or enrage you. You will have a new image that is high in contrast, color saturation, and details beyond what you could imagine. Done tastefully (dare I say properly) HDR images are a wonderful addition to your photographic repertoire but, overdone, they are less than pleasing. In all cases, HDR processing will give you new insights to your photography so you should give it a try.

Selling nature photographs, or not

In my entire photographic life I have never considered the idea of making my photographs available for others. I photographed what I wanted and where I wanted and hid the old 35mm slides away in dozens of metal storage boxes and Kodak Carousels. The chore of dragging out a slide projector and setting up a screen made our guests fortunate that this was a rare occurrence.  My slides remained hidden away and lost even to my memory.

Digital photography changed a lot of things and made my images available to me on a laptop at any time. I could forward a photo with an email to selected family and friends and even send the shot to multiple people at one time. I started getting comments back and found that others sometimes enjoyed seeing the same sights as I did. When I became free to travel more, my photos became more diverse and more interesting and I finally started a travel photo website. It was cumbersome, time-consuming, and difficult to maintain so I abandoned the site. Later, when I started full-time traveling, I revived the site and decided that posting photos was almost as much fun as taking them. 

Full-time travel allowed me to visit places most people dream about and to stay in places of natural beauty as long as needed to capture lasting images of the experience. I invested in camera gear, lenses, and processing software that most hobbyists cannot and the quality equipment improved the quality of the images. They were more interesting to view.

Then Natural Photography happened. Now I have a site that is easy to navigate and more pleasing to view.  Friends have asked for copies of photos and freely given their comments. Now many photos from the 20,000 plus that were taken over the last couple of years are posted and available for viewing, digital down-loading, and printing in many formats. Any image on the site is available as a print of your favorite size, matted and framed in a selection of custom frames, or printed on canvas or a ready to hang 'stand-out' foam-backed print. As novelties, images are available on mugs and cups, key chains, magnets, mouse pads, buttons, coasters, and bookmarks.

I hope you will view the galleries and find images that relate to you, your travels, and your most personal experiences and will consider down-loading the images or purchasing prints or novelties. Thanks for visiting the Natural Photography blog.